 Log in
.png?v=128640926290572426761721276470)
.png?v=36842855526768743601721276470)
%20(1).png?v=182848654424797603751721276470)


.webp?v=99212268323889089111721276470)
An unexpected tyre puncture can not only be an inconvenience to continuing your journey but can also be bewildering when you are not with a friendly helper somewhere on the way. But just a note of gratitude: tubeless tyres are more reliable; new punctures shouldn’t be a big deal. Simply with a tubeless tyre puncture kit, you can get the problem solved in just a few minutes without even the need for master help. These packages are portable, practical to use, and a must-have for any motorist, biker, or cyclist. In this article, we will provide you with the detailed process of mending a tubeless tyre puncture with the help of a quick and effective apparatus.
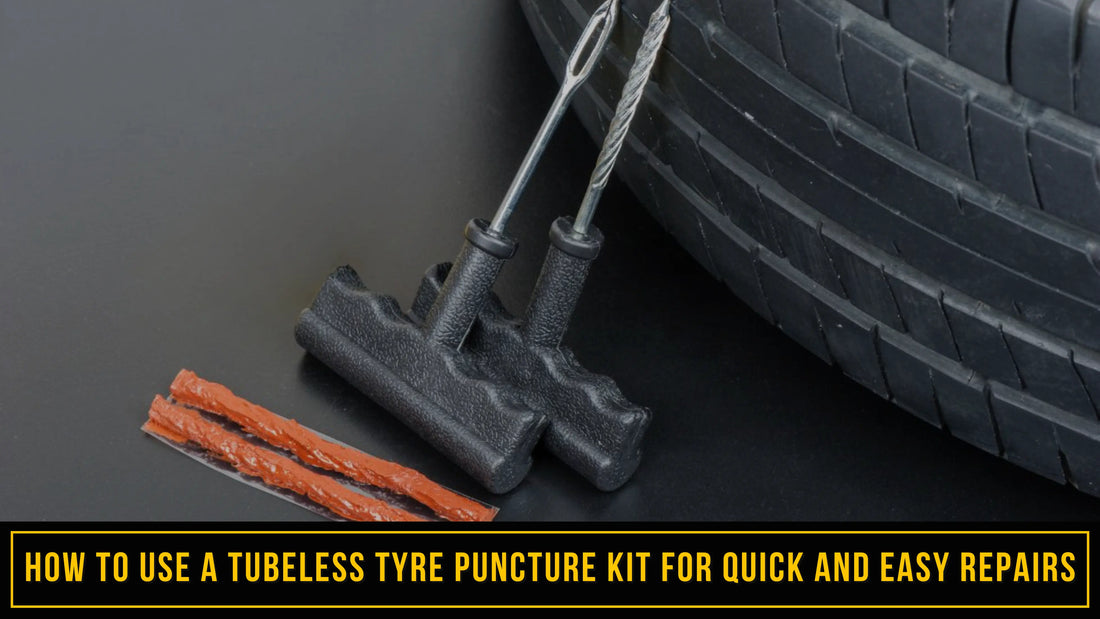
What Is a Tubeless Tyre Puncture Kit?
The tubeless tyre puncture repair kit is a very simple but very effective repair tool that is made to fix small punctures in tubeless tyres. It comes with the essential tools and materials such as:
-
T-handle reamer tool – to clean and widen the puncture hole.
-
T-handle plug insertion tool – to insert the rubber repair strip into the hole.
-
Rubber repair strips (plugs) – to seal the puncture and prevent air leakage.
-
Rubber cement (optional) – for added sealing strength, binding it by getting settled and working it out.
-
A pair of pliers (sometimes included) to remove the foreign body from the tyre. This kit's mobilization is not thoroughly a necessity and can, therefore, be used by anyone who has an idea about tyre maintenance.
Step-by-Step Guide to Using a Tubeless Tyre Puncture Kit
Step 1: Locate the Puncture Before you begin the repair process, you need to find the puncture in your tyre.
Here’s how: Inflate the tyre slightly so you can check for any air leaks. When you can't see the puncture, do the soapy water test. Apply soapy water on the surface and see if bubbles appear in a certain spot; that would indicate the leak. In case there is a nail or a screw in the tread of the tyre, it is better not to remove it now but to keep it like that until you get the hole plugged.
Step 2: Remove the Object Causing the Puncture:
Use pliers to gently pull out the nail, screw, or any sharp object from the tyre. Be prepared for some air to escape once the object is removed.
Step 3: Prepare the Puncture Hole:
A T-handle reamer is a tool used to punch a hole, put it in, and turn around a couple of times. Next, it is lubed with a cradling motion to free the hole. Ample lubrication will offer the required tight seal, which is essential to completing the repairing process properly. Then, use the T-handle reamer to carefully push and pull it in and out of the hole a couple of times. This will help dislodge any trapped particles and will widen the hole slightly, which will help the strip to have a good seal when it is inserted. There should be a recess in the hole for the plug, which would be large enough to cover the rubber repair strip while, at the same time, it should not be too much to have the tyre’s integrity compromised by it.
Step 4: Insert the Repair Strip:
Take one rubber repair strip and eye it through the plug insertion tool. Use the eye of the T-handle plug insertion tool and put the rubber repair strip at one end of the eye to form a connection. Take a rubber repair strip and thread it through the eye T-handle plug insertion tool. Then seal the hole tight with a little rubber cement (if there is some available) on the strip so that the strip can bond to the tyre easily. The second file should show how to push the tool with the repair strip into the puncture hole and then pull the tool out. After that, the strip should stay in place, thus sealing the hole.
Step 5: Trim the Excess Repair Strip:
Use the included blade or cutter to trim away any part of the repair strip that sticks out of the tyre's surface. The rest of the plug will blend in with the tread over the next few times you drive.
Step 6: Reinflate the Tyre and Check for Leaks:
Go to the inflator or air pump and check the tyre pressure. Use a tyre inflator or air pump to reinflate the tyre to the recommended pressure. Check the repair to see if the leak persists by applying soapy water to the “patch” and looking for air bubbles.
Conclusion
Early punctures are a common occurrence when you are on the road, but with the tubeless tyre puncture kit, you will avoid big trouble because there will be no need for you to wait for roadside assistance anymore. The magic tool is a simple punctuate one, but it helps you to fix punctures on the go, thus you will save your time and money both.
If you're an everyday commuter, a biker, or an adventurist, learning the basics of tyre repair with a patch kit could make you a Schöpfer. At Involve Your Senses, we believe the best support that we can give is to train our drivers and equip them with skills. On the other hand, if you are equipped with a tubeless repair kit, a minor flat tyre will never be an obstacle to your plans. Stay alert, be safe, and let your journey be the kind of trip in which you own the road!


